Shared by Zoe Kanan
Egg Challah With Honey
Yield: one 3-strand braided challah + one 4-strand braided challahTime: 7 hEgg Challah With Honey
Yield: one 3-strand braided challah + one 4-strand braided challahTime: 7 hIngredients
For the dough
- 2 ¼ teaspoons instant yeast
- 1/2 cup + 2 tablespoons water, lukewarm
- ⅓ cup whole-wheat flour (or all purpose flour)
- 3 cups all purpose flour
- 1 whole egg, room temperature
- 2 egg yolks, room temperature
- ⅓ cup + 1 tablespoon vegetable oil
- 3 tablespoons honey
- 1 ¾ teaspoons sea salt or kosher salt
- Non-stick vegetable oil spray or vegetable oil
For the egg wash
- 1 whole egg
- ¼ teaspoon sea salt or kosher salt
1 tablespoon olive oil, for brushing
Preparation
Step 1
Make a slurry: stir the yeast, warm water, and whole wheat flour together in a small bowl and let stand uncovered for 15 to 20 minutes until lightly bubbled and active.
Step 2
Add the remaining 3 cups of flour and salt into a bowl. Set aside.
Step 3
In a seperate large bowl whisk together the whole egg, 2 egg yolks, ⅓ cup vegetable oil, and honey until smooth. Add the slurry and stir to combine.
Step 4
Add the flour and salt into the wet ingredients and begin to stir with your hands until a shaggy mass forms.
Step 5
Transfer onto a clean kneading surface, making sure to scrape out as much residue from the bowl as possible. Knead until a smooth dough forms, 5 to 7 minutes, scraping from the surface and lightly dusting with flour as needed.
Step 6
Place the dough into a lightly oiled bowl or container and cover with a lid or plastic wrap. Set in a warm place to hydrate and ferment until doubled in size, 2 to 3 hours depending on the ambient temperature.
Step 7
Line a baking sheet with parchment paper (or lightly oiled foil) and oil a 9”x4” loaf pan and set aside.
Step 8
Lightly dust a clean surface with flour and transfer the challah dough onto the surface. Use a baking scale to divide the dough into 2 halves.
Step 9
Divide the first half of dough (Half A) into 4 equal pieces and the second half of dough (Half B) into 3 equal pieces.
Step 10
Flatten or roll out each piece of challah dough and shape into a tight log.

Step 11
Roll each log with your fingertips in a back-and-forth motion, extending your arms out bit by bit, until the strand is about 13” long.
Step 12
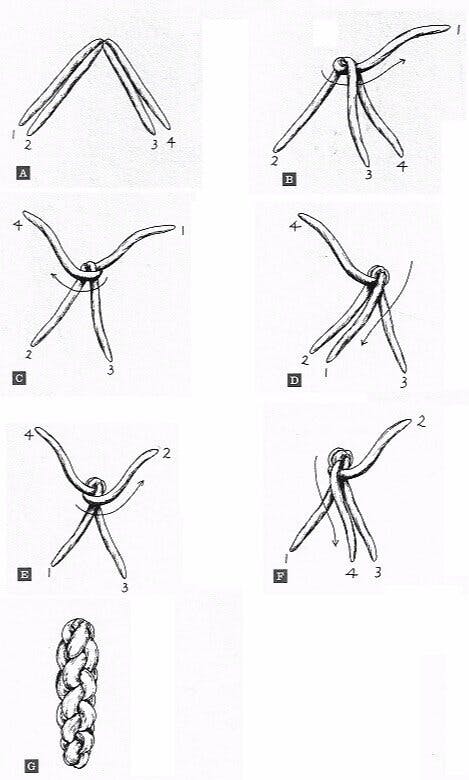
Use the 4 strands from Half A to form a 4-strand braid (see figure below) and place on the prepared baking sheet.
Step 13
Use the 3 strands from Half B to form a 3-strand braid and gently place in the prepared loaf pan.
Step 14
Place 1 tablespoon of vegetable oil in a bowl for brushing. Use a pastry brush or a non-stick oil spray to lightly brush or spray the loaves with vegetable oil.
Step 15
Cover thoroughly with plastic wrap and set in a warm place to rise until expanded in volume 2.5x, typically 3 hours. Alternatively the loaves can be refrigerated overnight to rise and brought out to room temp for 30 minutes to 1 hour before baking, or as needed until fully proofed.
Step 16
Repeat the oil wash every hour or so to keep the surface of the dough from drying out.
Step 17
Arrange the racks of an oven in the bottom and upper thirds and preheat to 375F.
Step 18
The loaves are ready to bake once they hold an indentation when poked for 2 seconds without any significant spring back.
Step 19
Whisk a whole egg with salt in a small bowl until no strands remain. Egg wash the surface of the challah, straining the brush of excess liquid, with extreme lightness and care to keep from deflating the delicate dough. Avoid runny egg wash seeping along the bottom and sides of the loaf. This will seal in the oven and can make the bread difficult to unmold.
Step 20
Place the 4-strand loaf on the top rack and the 3-strand loaf on the bottom. Bake for 10 minutes, egg wash again, rotate the loaves for even browning, and continue baking 7 to 10 minutes for the 4-strand loaf and 12 to 15 minutes for the 3-strand. The goal interior temp is 195 to 200F.
Step 21
Immediately unmold onto a cooling rack and brush with olive oil. Let cool for at least 30 minutes to allow structure to set.
Step 22
Serve warm.
Baker’s Note: This challah is best enjoyed the day it is made! Store leftovers in a plastic bag or plastic wrapped.
